Welcome back to my latest series, “How to Make a D&D World Map: A Non-Artist’s Guide”!
If you’re new to this post series, this guide is designed to walk you step-by-step through the process of making a world map for your D&D campaign. In Part 1 I covered the steps for shaping your landmasses and adding a few terrain features. Part 2 started with placing rivers, and ended on “naming strategies” for places on your map. Today’s post (part 3) will cover adding in roads as well as a few unique features!
How to Make a D&D World Map: A Non-Artist’s Guide
Part 1: Introduction & The Lay of the Land
Part 2: Civilizations & Regions
Part 3: Roads, Transportation, & Unique Features (you are here)
- Connecting Major Cities
- Paths, Paths, Paths!
- Unique Features
Part 4:From Paper to PDF
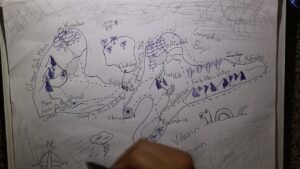
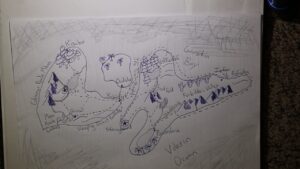
By the end of Part 3, your world map might look something like this:

Connecting Major Cities
The first thing we’ll be doing to our D&D world map is adding in some well-traveled roads to connect the major cities. Each city does not need to be connected to every other city, but it will likely be connected to at least one or two. For me, this basically entailed drawing roads in a circle around each of the islands. Each of the cities started by being connected to two other cities in a clockwise/counterclockwise manner.
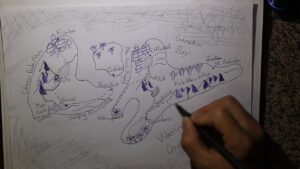
As far as actually drawing these roads, I ended up using dashed lines ( – – – – – ). Since almost everything has been in pen, some of the landmarks might start to blend together. Using dashed lines helps to eliminate this issue (though it’s not perfect). As stated in the previous “How to Make a D&D World Map” posts, don’t worry too much about specifics/finality since we will be completing the map with a computer in Part 4!
When adding in your biggest roads, it can be helpful to imagine them as the fantasy equivalent of interstates (for non-US readers, these are massive highways with multiple lanes that can span across a the entire country). These main roads will typically have a lot of traffic…for a D&D world.
As your players travel these roads, they are likely to come across multiple other traveling parties. This could be as simple as a family taking a vacation to the coast. However it could also be a merchant caravan, a troupe of performers, or a platoon of royal soldiers on patrol.

Paths, Paths, Paths!
Now that you’ve added the primary “interstates” for your D&D world map, it’s time to draw in some of the smaller highways! These smaller paths will function as intermediate roads between the larger roads we just placed. Essentially we’ll be adding in some “paths between paths”.
When it comes to adding these smaller paths, take a moment to step into the mind of a traveler on your roads. Are there any places along the main roads where someone might want to change direction (left/right)? If there is a location where two main roads are close to each other, consider connecting them with a side road or path! Consider all the different places that someone may want to travel to and add some smaller paths accordingly. There’s no need to over-do this, of course, since our map is already quite ‘busy’. Remember that this is a world map! Keep the smaller details for smaller maps.
Water Transportation
Somewhere on your map, you’ll probably have two different cities or regions that are separated by a stretch of water. If you think people would want to travel between them, go ahead and add in some more dashed lines! These will represent the various routes that are taken by boats and ships. When drawing my water routes I tended to stay pretty close to the shoreline, but keep in mind that boats may take the most direct path to save themselves some time. Of course the dashed just represent the most commonly traveled water routes, and are not meant to restrict where boats can go.

Unique Features
The final step for creating this D&D world map (before transferring to a digital copy) is to add in a few unique features! Some of these might just provide the players with further information about the world, but others – the more exciting ones – are meant to provide the players with a glimpse of possible “end-game” content. Unique parts of the map may provide clues to unlocking an ancient mystery, or they may represent different myths and legends that have been passed down through the ages. One common feature to include on your map is MASSIVE SEA CREATURES!
This step is important for giving your map a unique flavor that represents the world which you have been creating. There’s no right-or-wrong way to approach this section. Essentially just add in some things that you think would be cool for players to come across. I’ll provide a few examples to get the juices flowing, but the rest is up to you. Get creative and get weird with it!
Examples of Descriptive Features
- Docks
- Lighthouse
- City Walls
- Boats
- Mines
- Farmland
- Small Animals
- Compass Rose (the thing that shows where North is)
Examples of Exciting Features
- Treasure Chests
- Flying Machines
- Massive Storms
- Sea Monsters
- Land Monsters
- Huge Fog Patches
- Cracks in the ground
- Extra-planar Vortex
- Sunken Ruins
- Witch on a broom
That’s really all there is to it! It’s definitely not the prettiest thing ever made, but it is a great starting point for a D&D world map. Today’s post was pretty short and straightforward, but the final post in this series is going to be quite lengthy and detailed – check out Part 4 here!

FREE 5 day email course
Be sure to join the email list and sign up for the FREE 5-day email course centered on running your very own homebrew campaign! You'll learn everything you need to get started, from designing a story arc to reacting to (unexpected) player choices.
Running a D&D Prison Rescue
Did a character end up in jail? Here's how to...
Read MoreHow to Make Your D&D Players Think You’re a Super Genius
Trick your D&D players into thinking you DEFINITELY had things...
Read More5 Free Tools Every New DM Should Know About for 5e
Check out these free DM tools for making your life...
Read More


