
Welcome back to “How to Make a D&D World Map: A Non-Artist’s Guide”, the series where I’ll walk you through a step-by-step process for creating a world map to give to your players. Remember, this tutorial series is designed to produce a working campaign map rather than a beautifully drawn map.
How to Make a D&D World Map: A Non-Artist’s Guide
Part 1: Introduction & The Lay of the Land
Part 2: Civilizations & Regions (you are here)
- Adding Rivers
- Placing Civilizations
- Naming Civilizations
- Naming Regions
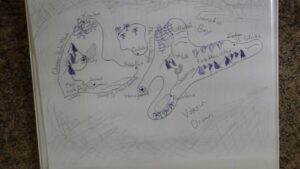
By the end of Part 2, you should have something that looks a bit like this:
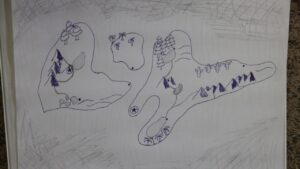
Adding Rivers
The first thing that we’ll be doing in Part 2 is placing a few of the major rivers onto our world map. Although Part 2 is primarily focused on civilizations, it’s important to first know the complete layout of water. We want to know this because civilizations, without a doubt, tend to be located near sources of fresh water. Although it may not be as critical in a world of magic and fantasy (where spellcasters can conjure water anywhere they damn-well please), it’s still something that you’re going to want to take into account before placing cities and villages.
A very important thing to remember when it comes to placing your rivers is that water flows from high elevation to low elevation. So does everything else, unless magic is involved, but that’s beside the point.
I’m certainly no geologist meteorologist hydrologist (water person), but here’s a few pointers about the water cycle. Rain and snow come down from the sky when clouds (nimbus) have had enough of water’s shit and give it das boot. After this, the water uses mother Earth as a giant slide and becomes surface run-off, slipping and cruisin’ its way down hills and mountains. Eventually a bunch of surface run-off finds a nice little channel and forms a union, or something that we might call a stream/brook. These continue to link together as they flow downhill to form an even stronger and indomitable superPAC (ie: river). The water continues to give in to the urges of gravity, and eventually finds a home in a pond, lake, or ocean. At this point, the Sun is like “hey wait man, not cool” and the water evaporates thus starting the cycle over.
Obviously this isn’t the most scientific explanation, but if you still have questions this video should clear them up.
So what the hell was the point of me typing all of that out? Mostly to reinforce the two main principals when it comes to adding in rivers: water flows from high to low (mountains -> oceans), and smaller streams merge together to form big rivers.
With that being said: it’s your world and you can do whatever you want! These are just general principals based off of how Earth works, but your world might be completely different.
Now go ahead and place some rivers onto your map! Remember that you only want to place the major rivers, as this is a world map and not a regional map.
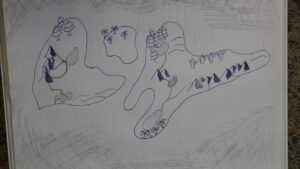
Placing Civilizations
With that all said-and-done, it’s time to start placing some civilizations onto your D&D world map!
The two big questions to ask yourself during this section are:
- How many civilizations do I want?
- Where do I want to put them?
How many civilizations do I want?
For my world map I decided (arbitrarily) that I wanted there to be two distinct kingdoms, split into the Eastern continent and the Western continent + Island. This means that I will need two different capitol cities, as well as a handful of smaller cities/villages that each kingdom rules over.
I was going to recommend placing 6-8 total cities on your map to avoid things getting too crowded. However, when making the accompanying map/video for this article, I got a bit trigger-happy and ended up placing 10 total civilizations – oops. With that being said, I would say anywhere from 7-10 cities (including capitols) is a good amount to place on your world map.
Where do I want to put them?
Since this is your D&D world map, there’s no specifically right or wrong way to choose where to place your civilizations. If you wanted – for some reason – to place them all in a singular cluster in the middle of the map, do it!
However, I think it can be helpful to take a moment ask yourself “why” when placing each of your civilizations. More specifically, “Why did people choose to settle here, at this exact location?” You don’t need to write out an entire thesis explaining the choices of people in your world.
Almost universally, the answer to this question is going to be proximity to resources. Each of your civilizations doesn’t need to be next to every single natural resource – that is a main reason for establishing trade routes – but it’s probably going to be placed near a few key or unique resources.
Here’s a few examples to get your meat-calculator going:
- Fresh Water
- Food Supply
- Farmland
- Wild animals
- Fish/Seafood
- Wild vegetation
- Industry Specific Resources
- Precious gems/ores
- Rare plants/herbs
- Timber
- Strategic Positioning
Keeping these points in mind, get creative and add in the major civilizations to your D&D world map. I ended up using “star circles” for the capitols and simple dots for any other cities, but whatever you feel like using is fine too!
Naming Civilizations
The next step is to give these civilizations a name!
I’ve always struggled a bit with coming up with names for fantasy worlds – whether it be for NPCs, taverns, or cities. Often times I just wasn’t satisfied with what I came up with, or I would stare at the blank paper for what felt like forever. Thankfully, I now have a method that gives me unique names that just feel good.
This section is a bit tricky for me to describe over text (since it involves saying words over and over again and playing with the phonetics), so I highly recommend checking out the accompanying video where I talk through the process a few times.
Method 1: Repeating Related Words
The first thing I’ll do is a (very) small amount of worldbuilding for the city that I’m trying to name. This really shouldn’t be anything more than a sentence or two. I try to figure out “what the city is based on”, or a major theme for the city. If you placed your civilizations near important resources during the previous step, this should be a bit easier. It will still require some imagination (since you might be only basing it off of 3 trees and a dot), but it doesn’t have to be anything too crazy and you can always change it later.
I’ll then take a few of these “theme words” and say them over and over (and over) again. You’ll want to do this sort of quickly so that the words blend together a bit. As you’re saying them, listen for anything that sticks out as a name. I tend to find that something will “jump out” at me relatively quickly.
After this, mess around with how the word is spelled. This might include just changing the spelling, or adding and removing some letters to actually change the word itself. I’d also encourage you to use accent marks or spelling variations from foreign languages (example: instead of using ch in the spelling, try using cz instead. It’s still pronounced the same, just spelled differently).
Example 1:
A town located near a large lake, the ocean, and tropical forests. When I think about what visiting this town is like, the first thing that comes to mind is a “palm breeze”. So I say “palm breeze” over and over again until I came up with a name.
Palm breeze -> Pawmbrie
Example 2:
A city known for high quality maple syrup exports may have a lot of sticky sap everywhere. I repeated to myself – like a crazy person – sticky sap, sticky sap, sticky sap, sticky sap. I wasn’t totally satisfied with the name right off the bat, so I modified it a little.
Sticky sap -> Kisapp -> Kisabo
Example 3:
A peaceful village hidden in the forest reminds me of escaping to a cabin in the woods. I associate cabins with a bunch of leaves being everywhere, so my term here was “leaf escape”.
Leaf escape -> Liffeska
Give it a try and let me know what you think! I’ve grown to be very fond of this method for coming up with names.
Method 2: Suffixes and Descriptors
This second method for naming civilizations on your D&D world map involves using a combination of descriptive words or suffixes. Names created using this method will likely resemble places in real life a lot more than the unique names created with the previous method.
Using suffixes is pretty straight-forward. You can pick the name of a nearby land feature, or a prominent NPC family and simply throw a suffix on the end of it.
Here’s a few examples of suffixes/prefixes you can use:
-ton
-ville
-town
-borough
-stead
-ham
-ford
-Springs
– Keep
– Fort
– Gate
The use of descriptive words is just as simple and straight-forward, and is incredibly common in real life. Take two words that describe what the place is like and put them together. Though not always, the format of many of these names is: animal + land feature. It couldn’t be much simpler really, you got this!
Examples of descriptor-based names:
Eagle Peak
Pine Meadow
Woodland Grove
Bighorn Valley
Unleash your creative imagination and add some names to your newly created civilizations!
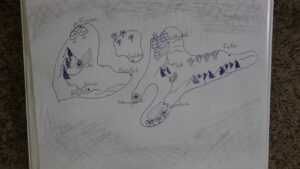
Naming Regions
With your world map starting to be populated, the final thing we’ll be doing in Part 2 of this series is adding in a few names for different regions.
Use the same strategies for coming up with names as described in the previous section. The only difference is that instead of getting names for civilizations, you’ll be creating names for larger geographic regions.
Examples of Regions to-be-named:
- Mountain Ranges
- Deserts
- Lakes
- Rivers
- Oceans
- Bays
- Valleys
- Forests
- Continents
When naming these regions, I’d encourage you to throw in some fantasy-related names for some of them. We are trying to make a D&D world map after all, not a map based in real life. For example, you might consider adding in some names such as “Kobold Creek”, or “Dragon’s Peak”.
Additionally, don’t feel like you need to fully write out everything on your map; you don’t want things too squished together! If it makes your life easier, feel free to simply write a number next to a mountain range or forest and then make a “name guide” at the bottom of the map. Keep in mind that we will be transferring this all to digital in Part 4 of this series, so everything at this point is really just a placeholder that we’ll be referencing later.
I’ll keep this section brief since it’s mostly an extension of the previous section. What are you doing still reading this?! Go add some creative names to the regions on your D&D world map! We’re all done with Part 2!
Check out Part 3 (Roads, Transportation, and Unique Features) Here!

A Dungeon Master’s Guide to 5e Rogues
Learn the ins-and-outs of 5e rogues to help you better...
Read More
How to Help New Players Build A Character
If you've got a new player and they need help...
Read More
How to Prepare for a D&D Session
Learn how to efficiently prepare for your next D&D session!...
Read More